Getting started
This conference room supports hybrid as well as in-person meetings. Tap the touch panel on the wall behind the podium to begin. The system may take a minute to wake up if the screen was dark.
If your meeting is hybrid, microphones in the room may need fresh batteries if the room has not been used recently. Remote participants cannot hear you if you don't use the microphones. See the microphone section for more information. IT can provide a tutorial on using the equipment (email it-support@nber.org). For all day events, it is best to make sure the rechargeable batteries are charged overnight. See this section if a microphone is dead.
Video Call Mode
These instructions assume you are using Zoom, but you can use any hybrid or video meeting software.
Choose Video Call Mode, the TV will then show the PC display. Please note that it may take up to a minute for the PC to appear on the TV if it has been off. If the TV doesn't power on, press Display Controls at the bottom of the screen and press the On button for power and wait a minute or two until the TV powers on.
You must use the PC in the room for hybrid meetings. You can always join the Zoom from another laptop, either at the podium or tables, but the cameras and microphones work through the PC in the room. This PC is located in the rack; the wireless keyboard and mouse you see on the table control the PC, and you can see what is on the screen on the TV.
Presentation Mode
This is for an all in-person meeting only. If cameras are required, you must see the Video Mode section above.
Choose Presentation Mode to wake up the PC. From the touch panel, choose Wall Laptop if connection to an external device (phone, laptop, etc.) is necessary. There are a series of adapters attached to the HDMI cable in the wall that allows you to connect your external device to the system, including iPads and other mobile devices. If you are going to present from a laptop at the podium, connect the laptop with the provided HDMI cable to the wall connection.
Use the Wireless Device if there is no way to physically connect external devices to the system or if you need to connect to a device that is out of reach of the adapters.
If operating an Apple device:
- Open your Apple device and open "Control Center."
- In "Control Center," there is an icon with two rectangles, one slightly on top of the other. This is the "Screen Mirroring" icon.
- Click on the Screen Mirroring icon and select AM-Conference207.
For all other devices, enter http://10.88.0.51 into your web browser.
Microphones
There are three different kinds of microphones available. Microphones are required to capture audio for a hybrid meeting and remote participants to hear you, and they also provide light amplification in the room. See the Advanced Microphone section if you need to tweak the audio level, but generally we recommend not touching this as the microphones are preset at a generally acceptable level.
Podium Microphone
The podium microphone is always on. To mute without using the wall-mounted screen, press and hold down the push button located at the base of the microphone. When you are pressing down, the microphone is muted. Otherwise, it will continue to be unmuted. All other settings can be found on the wall-mounted screen under Adv. Mic Controls.
Wireless Microphones
There are five wireless microphones in this conference room, two on floor stands and three on table stands. Each is labeled with a number designation that corresponds to the number on the touch panel. There is also a Catchbox with a wireless microphone. An additional lavalier (wearable) wireless microphone can be provided if requested in advance to IT.
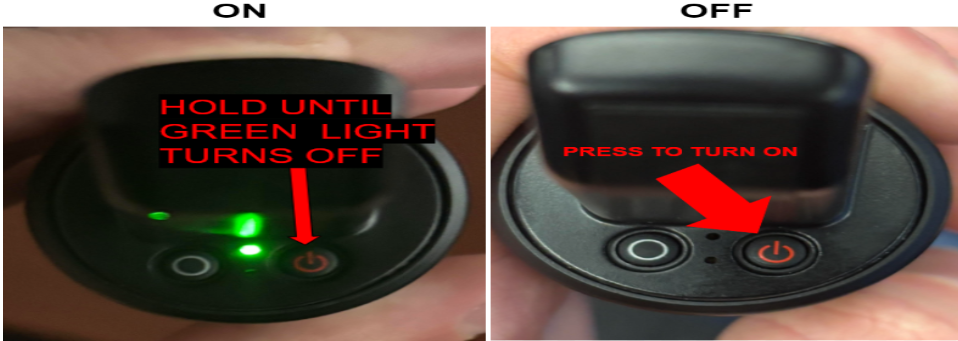
To turn on, look at the bottom of the microphone and press the red power button. There should now be a blinking light. To unmute the microphone, slide the slider (located below the microphone number) upwards. To mute the microphone, slide the slider downwards.

For reference, a blinking green light means that the microphone is unmuted. A blinking yellow light means that the microphone is muted. To turn off the microphone, hold the red power button (located on the bottom right) until there is no more light.
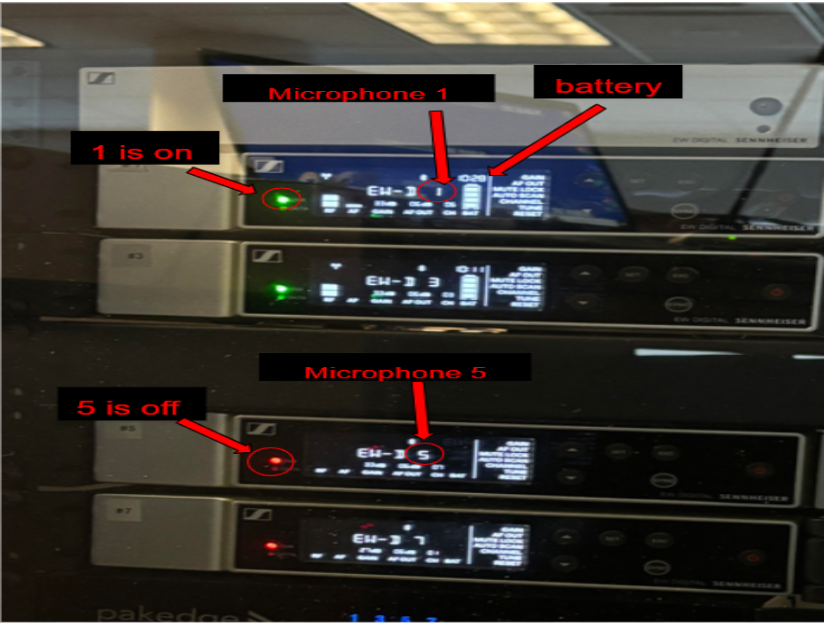
Before your meeting begins, check the battery level of each microphone. This information is located in the large wooden electronics cart located on the right of the presenters stand. There will be 6 rectangular boxes with screens indicating the battery percentage of each microphone. Every microphone has a label with a number mapping a screen to a microphone. These screens will also show if a microphone is on or off.

What to do if a microphone is dead?
In the event a microphone is dead, there are four extra microphone batteries on top of the technology cart to the right of the speaker stand. If possible, contact it-support@nber.org for immediate support in changing the batteries. If this is not possible, twist the microphone handle until it unscrews. Then, take out the old battery and replace it with a charged battery. Then, screw on the handle and turn it on again.
Catchbox microphone
Toss the blue NBER Catchbox microphone around for collaborations or group discussions.
To turn on the microphone, carefully remove the black velcro foam at the top of the Catchbox. Inside should be a black cylinder. To remove the black cylinder, carefully twist the black cylinder 90 degrees to either the left or the right. This will disconnect the magnet and allow for removal of the black cylinder.
There are two on buttons for the Catchbox microphone:
- The first one is located at the back of the black cylinder, slightly underneath the exposed battery. Turn the switch from off to on. The light next to the switch should turn on green. If it is red, replace the battery.
- To access the second on button, unwrap the black velcro located on the side of the black cylinder. Carefully remove the Catchbox microphone from within the black cylinder while leaving it connected to the black cylinder. Pinch the two buttons located on the side of the microphone to expose the batteries. Then, press the red power button to turn on the microphone.
A light should appear at the top of the microphone. You have now turned on the Catchbox microphone. Put the microphone back into the black cylinder. Secure the black cylinder with the velcro that is located on the side. To correctly put the black cylinder back into the foam box, align the white triangular-shaped magnet (located on the bottom of the black cylinder) with the white triangle magnet within the foam box. Finally, reassemble the box by putting the foam top back on top of the Catchbox.
Advanced Microphone Controls
In order to adjust the volume or mute all of the microphones, use the MIC S Volume bar on the left side of the wall-mounted screen. If adjustments for individual microphones are necessary, press Adv. Mic Controls located at the bottom left corner of the wall-mounted screen. You can also mute and unmute each microphone through the Adv. Mic Controls.
For support, please email it-support@nber.org.